We’ve all been feeling the pinch lately, haven’t we? With groceries costing an arm and a leg, and the cost of living reaching new heights, especially here in Canada, it can feel like every penny counts. But fear not! Even in the face of tight budgets, there are still plenty of ways to enjoy some quality time with your kids without breaking the bank. And guess what? You might already have some of the supplies you need lying around the house. Whether you’re a tech wizard or just getting started with the whole “turning things on” gig, I’ve got a whole bunch of awesome projects lined up for you and your little ones. So, dust off your gear, gather ’round the table, and get ready for some good ol’ fashioned DIY tech fun that’s sure to put a smile on everyone’s face!
1. DIY Smartphone Projector


Step 1: Gather Your Materials
First things first, gather all the materials you’ll need for our first, fun family DIY tech project. You’ll need:
- A shoebox
- A magnifying glass
- Duct tape
- Your smartphone
Step 2: Prepare the Shoebox
Take your shoebox and carefully cut a hole in one end large enough to fit the magnifying glass. This will serve as the opening where the light from your smartphone will shine through.
Step 3: Attach the Magnifying Glass
Next, take your magnifying glass and position it at an angle inside the box, facing toward the opening you just created. Use duct tape to securely attach the magnifying glass in place. Make sure it’s angled in a way that will help focus the light from your phone.
Step 4: Insert Your Smartphone
Now it’s time to bring out your smartphone! Place it inside the shoebox, making sure the screen is facing towards the magnifying glass. Adjust the position of your phone as needed to ensure the image is centred and focused.
Step 5: Dim the Lights and Enjoy!
Once your smartphone is securely in place, turn on a movie or video of your choice. Dim the lights in the room to enhance the viewing experience, then sit back and watch as your DIY projector brings the screen to life on any flat surface!
Step 6: Explore and Learn
As you enjoy your homemade movie theatre, take some time to explore the science behind projection and optics with your kids. Discuss how the magnifying glass helps to focus the light from your phone, and how the image is projected onto the surface. This project provides a great opportunity to learn about the principles of optics in a hands-on and engaging way.
If you’re more of a visual learner, TechBuilder on YouTube has a great video.
2. Build Your Own DIY Robotic Hand


Step 1: Gather Your Materials
Before we dive into the fun, make sure you have all the materials you’ll need for our second DIY tech project:
- Drinking straws
- String
- Cardboard
- Tape
- Scissors
- Small motors (hobby motors work great)
- Wires
- Batteries
- Switches (optional)
- Hot glue gun (optional)
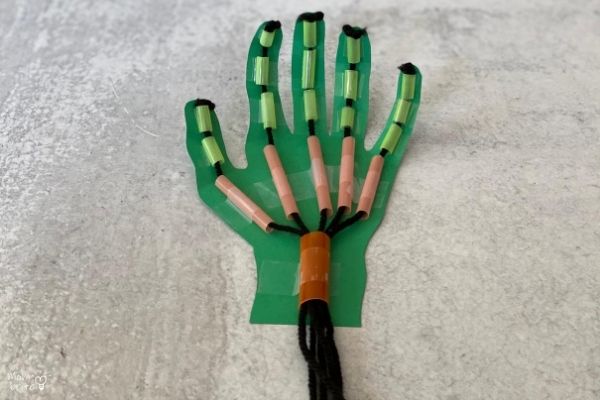
Step 2: Construct the Hand Frame
Start by cutting the cardboard into the shape of a hand. Trace your own hand or use a template to get the general shape right. This will serve as the frame for your robotic hand.
Step 3: Add Finger Mechanisms
Attach drinking straws to the cardboard hand frame using tape. Each straw will represent a finger. Make sure to leave space between each straw to allow for movement.
Step 4: Thread the Tendons
Thread the string through the straws in a way that mimics tendons in the human hand. Start from the tips of the fingers and thread the string through each straw, then secure the ends of the string at the back of the hand.
Step 5: Attach Motors to the Base
Attach small motors to the base of the hand using hot glue or tape. Position the motors in line with each finger, ensuring they can pull the strings when activated.
Step 6: Connect Motors to Power Source
Connect each motor to a power source using wires. This could be a battery pack or individual batteries. Make sure the connections are secure and double-check that each motor receives power when activated.
Step 7: Control Mechanism
Decide how you want to control your robotic hand. You can keep it simple with manual switches for each finger, or you can explore more advanced options like remote controls or microcontrollers for wireless operation.
Step 8: Test and Adjust
Test your robotic hand by activating the motors and observing how they move the fingers. Adjust the positioning of the motors and the tension of the strings as needed to achieve smooth and natural movement.
Step 9: Customize and Decorate
Encourage your kids to customize and decorate their robotic hand. They can add colours, stickers, or other embellishments to give it a unique and personalized look.
Step 10: Explore and Experiment
Encourage experimentation with different control mechanisms and programming options. Try out different gestures and movements to see what your robotic hand can do. This is a great opportunity for kids to learn through hands-on exploration.
Here’s a video from The Amaze Lab on YouTube. Though they make a manual hand, it’ll help you understand the first part of this project.
3. DIY LED Throwies


Step 1: Gather Your Materials
Now, for our third DIY tech project, make sure you have all the necessary materials:
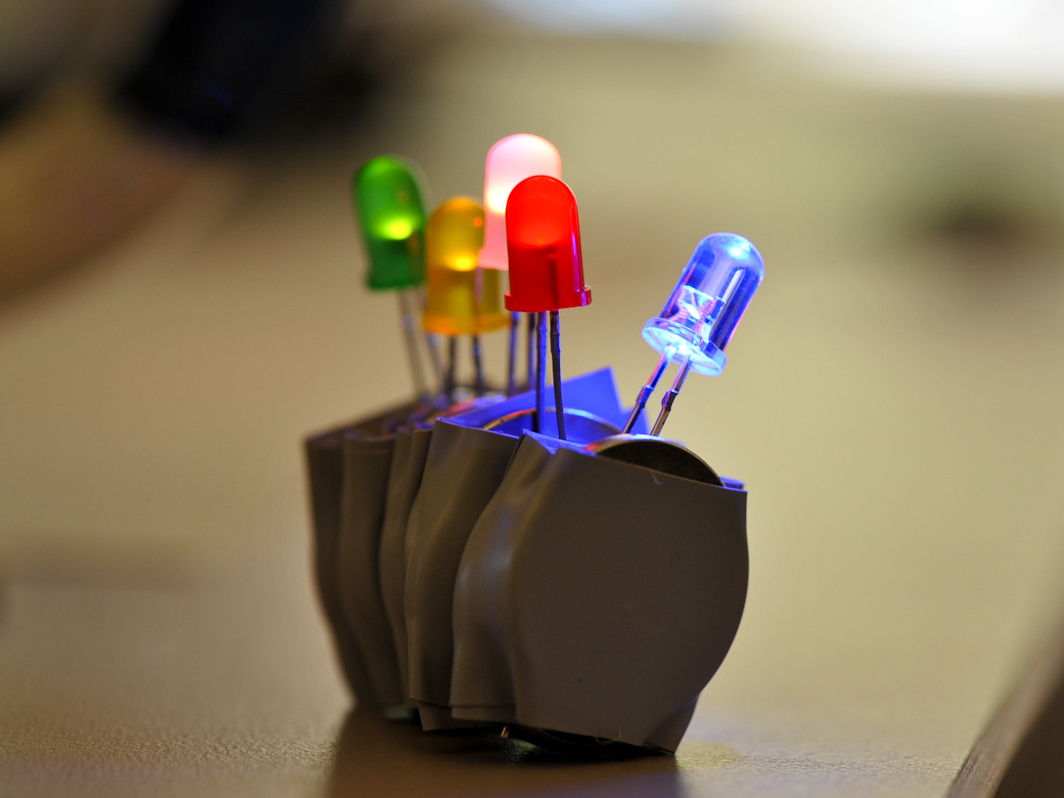
- LED lights (choose any colour you like)
- Coin cell batteries (make sure they match the voltage requirements of your LEDs)
- Magnets (small and strong enough to hold the throwies in place)
- Electrical tape (optional, but useful for securing the components)
Step 2: Prepare the LED Lights
Take an LED light and identify the positive (+) and negative (-) leads. The longer lead is typically the positive one. If your LEDs are not pre-wired, you’ll need to solder wires to the leads for easier connection.
Step 3: Connect the LED to the Battery
Take a coin cell battery and carefully connect the positive lead of the LED to the positive terminal of the battery. Similarly, connect the negative lead of the LED to the negative terminal of the battery. If necessary, use electrical tape to secure the connections.
Step 4: Attach the Magnet
Once the LED is securely connected to the battery, attach a magnet to the battery. You can use adhesive-backed magnets or simply tape them in place using electrical tape.
Step 5: Test the Throwie
Turn on the LED throwie by completing the circuit with the battery. If everything is connected correctly, the LED should light up, creating a miniature glowing orb. Test its magnetic properties by sticking it to a magnetic surface, such as a fridge or a whiteboard.
Step 6: Make More Throwies
Repeat the process to create as many LED throwies as you like. Experiment with different colours and arrangements to create unique lighting effects.
Step 7: Explore Circuitry Concepts
Take this opportunity to discuss basic circuitry concepts with your kids. Explain how the LED throwie works by completing a circuit with the battery, allowing electricity to flow through the LED and produce light. You can also discuss the science behind electricity and magnetism, explaining how magnets attract and repel each other.
Step 8: Decorate and Enjoy
Once you’ve made enough LED throwies, use them to decorate your home! Stick them to any magnetic surface to add a touch of brightness and colour to your surroundings. You can even create patterns or designs by arranging the throwies in different configurations.
Here’s a great video on these by The Royal Institution on YouTube:
4. DIY Electric Play-Doh Circuits


Step 1: Gather Your Materials
Before we begin our fourth DIY tech project, gather all the materials you’ll need for this:
- Play-doh (choose a variety of colours)
- LED lights (select different colours for visual appeal)
- Batteries (coin cell batteries work well)
- Wires (thin and flexible)
- Optional: Small buzzer or piezo speaker for sound effects
Step 2: Prepare the Play-Doh
Divide the Play-Doh into small portions and roll them into balls or other shapes. Ensure that each piece is large enough to accommodate the LED lights and batteries.
Step 3: Insert Components
Press the LED lights and batteries into the Play-Doh shapes. Make sure the positive (+) and negative (-) terminals of the LED lights and batteries are exposed and easily accessible.
Step 4: Connect the Components
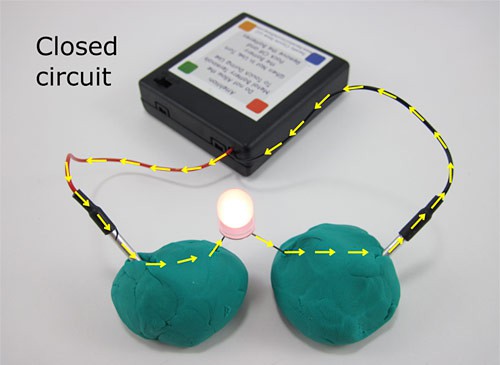
Use wires to create connections between the LED lights and batteries. Connect the positive terminal of each LED light to the positive terminal of a battery and the negative terminal of each LED light to the negative terminal of a battery. If you’re using a buzzer or piezo speaker, connect it to the circuit as well.
Step 5: Experiment with Shapes and Configurations
Get creative with your Play-Doh circuits! Mould the Play-Doh into different shapes and configurations, such as loops, bridges, or even 3D sculptures. Experiment with different arrangements to see how they affect the flow of electricity and the brightness of the LED lights. You can also add additional components, such as switches or resistors, to further explore circuitry concepts.
Step 6: Test the Circuits
Once your Play-Doh circuits are set up, it’s time to test them out! Activate the circuits by completing the connections between the batteries and LED lights. Observe how the LED lights illuminate and, if applicable, how the buzzer or piezo speaker produces sound.
Step 7: Explore Circuitry Concepts
Take this opportunity to discuss fundamental circuitry concepts with your kids. Explain how electricity flows through the wires and components, lighting up the LED lights and producing sound. Encourage them to ask questions and experiment with different configurations to deepen their understanding.
Step 8: Spark Curiosity and Imagination
Encourage your kids to get creative and explore the possibilities of electric Play-Doh circuits. Challenge them to design their own circuits and incorporate additional components to create unique effects. This hands-on and playful approach to learning about circuitry is sure to spark curiosity and imagination.
Here’s a video from Babble Dabble Do on YouTube:
5. DIY Virtual Reality Viewer


Step 1: Gather Your Materials
Here we are, our last DIY tech project. You know the drill, gather all the materials you’ll need for this DIY VR viewer project:
- Cardboard box (medium-sized)
- Lenses (you can salvage lenses from an old pair of binoculars or purchase them online)
- Velcro strips or adhesive
- Smartphone
Step 2: Prepare the Cardboard Box
Take the cardboard box and measure the size of your smartphone screen. Use a pencil to mark the area where you’ll cut a hole to fit your smartphone. Make sure the hole is large enough to accommodate the screen but not too big so that the smartphone won’t stay in place.
Step 3: Cut the Hole
Carefully cut out the marked area to create a hole in the cardboard box. Use scissors or a utility knife, and make sure to cut along the lines accurately to fit your smartphone snugly.
Step 4: Attach the Lenses
Place the lenses in front of the hole you cut in the cardboard box. Position them at a distance that will allow your eyes to focus properly when using the VR viewer. Once you’re satisfied with the placement, use Velcro strips or adhesive to secure the lenses in place.
Step 5: Adjust the Viewer
Test the VR viewer by placing your smartphone inside the box and looking through the lenses. Adjust the position of the lenses if necessary to ensure a clear and comfortable view. You can also trim any excess cardboard or make adjustments to improve the fit and comfort.
Step 6: Download VR Apps or Videos
Before you start using your DIY VR viewer, download some VR apps or videos on your smartphone. There are plenty of free and paid options available on app stores and online platforms. Choose a few that interest you and prepare to be transported to new and exciting virtual worlds.
Step 7: Enjoy Your VR Experience
Place your smartphone in the viewer, secure it in place, and get ready to immerse yourself in the world of virtual reality! Explore different apps and videos, and let your imagination run wild as you discover new and exciting experiences from the comfort of your own home.
Here’s a video from KmiX on YouTube:
Conclusion
As we come to the conclusion of our DIY tech adventure, it’s clear that these projects offer far more than just entertainment. They serve as catalysts for curiosity, creativity, and collaboration within your family, fostering a deeper connection and appreciation for the world of technology.
Whether you’ve built robots, explored virtual realities, or experimented with circuits, each endeavour has brought you closer together, sparking conversations and igniting imaginations. Though these projects might not be suited for toddlers, they are a great way to introduce your slightly older ones to the world of DIY and tech. Through shared experiences and hands-on learning, you’ve not only discovered the wonders of tech but also uncovered hidden talents and passions within yourselves.
So, as you reflect on the journey you’ve taken, remember the moments of laughter, excitement, and discovery shared with your loved ones. And as you put away your tools and gadgets, know that the spirit of exploration and innovation lives on within your family.
Who knows what new adventures await on the horizon? With each project completed, you’ve not only expanded your technical skills but also nurtured a sense of togetherness and possibility. So keep dreaming, keep creating, and keep exploring the boundless world of DIY tech. After all, the greatest discoveries often begin with a simple spark of curiosity and a willingness to try something new.


